Inspire Tests
How to Run the Selenium Tests
Via Docker
- If you have not installed
dockeranddocker-compose, install them now.
- Run
docker:
$ docker-compose -f docker-compose.test.yml run --rm acceptance
Via Docker with a graphical instance of Firefox (Linux)
- Check the first step in the Via Docker section.
- Add the root user to the list allowed by X11:
$ xhost local:root
non-network local connections being added to access control list
- Run
docker:
$ docker-compose -f docker-compose.test.yml run --rm visible_acceptance
Via Docker with a graphical instance of Firefox (macOS)
- Check the first step in the Via Docker section.
- Install XQuartz: go to the XQuartz website and install the latest version. In alternative, run:
$ brew cask install xquartz
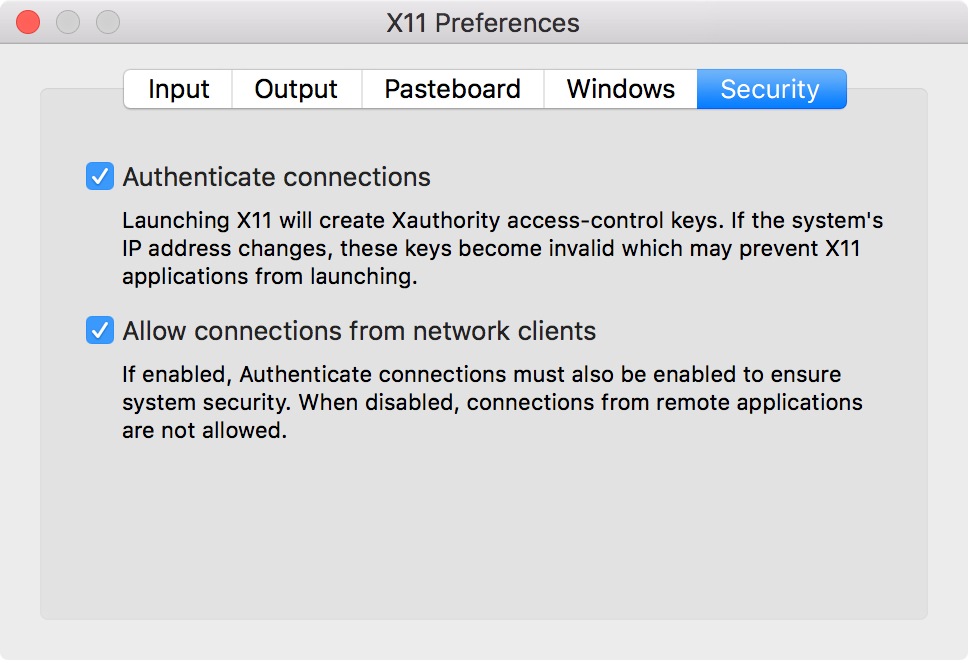
- Having installed XQuartz, run it and open the XQuartz -> Preferences menu from the bar. Go to the last tab, Security, enable both the “Authenticate connections” and “Allow connections from network clients” checkboxes, then restart your computer.
- Write down the IP address of your computer because you will need it later:
$ ifconfig en0 | grep inet | awk '$1=="inet" {print $2}'
123.456.7.890
- Add the IP address of your computer to the list allowed by XQuartz:
$ xhost + 123.456.7.890
123.456.7.890 being added to access control list
- Set the
$DISPLAYenvironment variable to the same IP address, followed by the id of your display (in this case,:0):
$ export DISPLAY=123.456.7.890:0
- Run
docker:
$ docker-compose -f docker-compose.test.yml run --rm visible_acceptance
How to Write the Selenium Tests
Selenium Test Framework
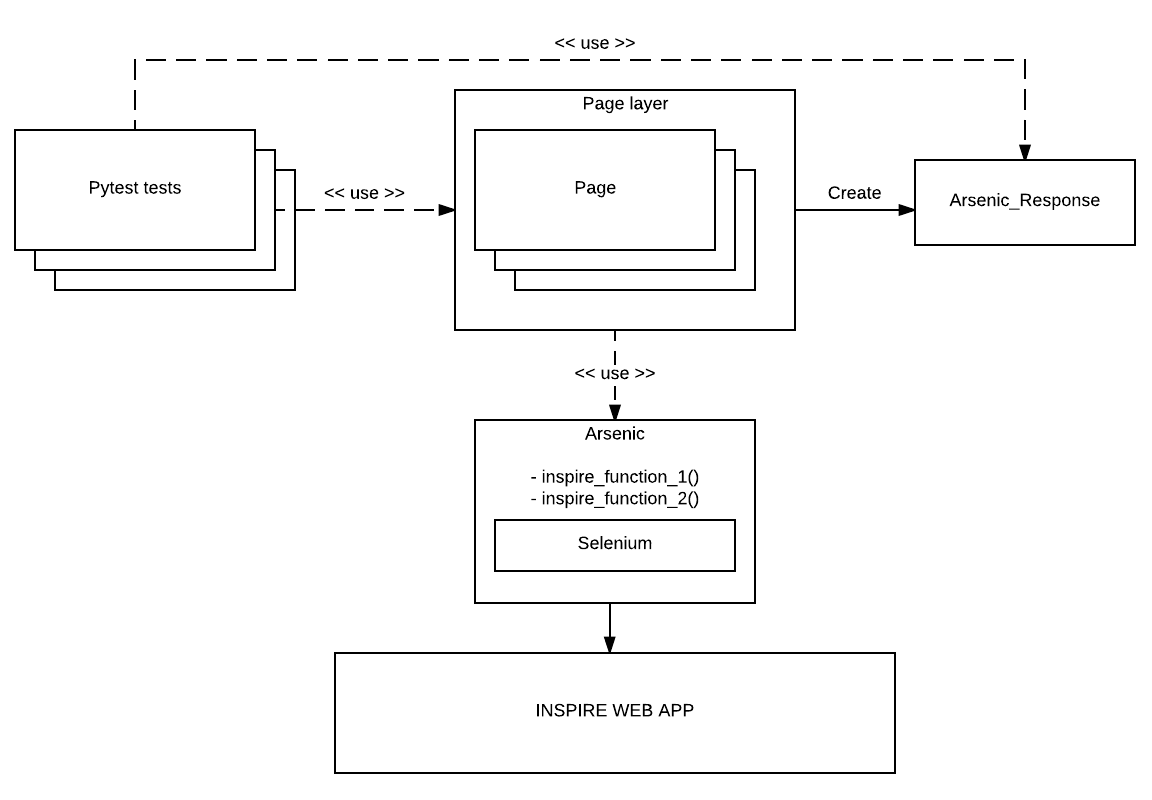
INSPIRE’s Selenium tests are written using an in-house framework called BAT
(inspirehep/bat). The framework is made of four main components:
- Tests
- Pages
- Arsenic
- ArsenicResponse
Tests
Tests don’t call directly Selenium methods, but call methods on Pages, which are eventually translated to Selenium calls.
Tests are intended to be imperative descriptions of what the user does and what they expect to see. For example
def test_mail_format(login):
    author_submission_form.go_to()
    author_submission_form.write_mail('wrong mail').assert_has_error()
    author_submission_form.write_mail('me@me.com').assert_has_no_error()
asserts that, when the user visits the “Create Author” page and writes wrong
mail, they see an error, while when they visit the same page but write a valid
email, they don’t see it.
Pages
Pages are abstractions of web pages served by INSPIRE. Concretely, a page is a collection of methods in a module that implement the various action that a user can take when interacting with that page. For example the
def go_to():
    Arsenic().get(os.environ['SERVER_NAME'] + '/authors/new')
method in inspirehep/bat/pages/author_submission_form.py represents
the action of visiting the “Create Author” page, while
def write_institution(institution, expected_data):
    def _assert_has_error():
        assert expected_data in Arsenic().write_in_autocomplete_field(
            'institution_history-0-name', institution)

    return ArsenicResponse(assert_has_error=_assert_has_error)
in the same module represents the action of filling the autocomplete field
of id institution_history-0-name with the content of the institution
variable.
Note that the latter method returns a closure over expected_data and
institution which is going to be used by an assert_has_error call to
determine if the action was successful or not.
Arsenic
The Arsenic class is a proxy to the Selenium object, plus some
INSPIRE-specific methods added on top.
ArsenicResponse
As mentioned above, an ArsenicResponse wraps a closure that is going to be
used by an assert_has_error or assert_has_no_error call to determine
if the action executed successfully or not.
How to Debug the Selenium Tests
Unlike the other test suites, the container that is running the test code of the
acceptance test suite is different from the one running the application
code. Therefore, in order to debug a test failure, we must connect remotely to
this other container. The tool to achieve this is called remote-pdb. This
section explains how to use it.
- First we install it in the container:
$ docker-compose run --rm web pip install remote-pdb
- Then we insert the following code where we want to start tracing:
from remote_pdb import RemotePdb
RemotePdb('0.0.0.0', 4444).set_trace()
- Now we run the
acceptancetest suite:
$ docker-compose -f docker-compose.test.yml run --rm acceptance
- At some point the test suite will stop: it means that we have hit the tracing
call. We discover the IP of the
webcontainer with:
$ docker inspect inspirenext_test-web_1 | grep IPAddress
[...]
"IPAddress": "172.18.0.6"
- Finally, we connect to it with:
$ telnet 172.18.0.6 4444
